
Building a Censorship-Resistant File Sharing App with Codex and Waku


In this article, I’ll be helping you deep dive into two complementary technologies within the Logos technology stack by building a simple censorship-resistant and peer-to-peer file-sharing application that leverages Codex and Waku.
Before we proceed, please be aware that this file-sharing application is not designed for production-level usage but as a proof-of-concept to understand the purpose of these technologies with the simplest possible level of implementation that is beginner-friendly.
What is Codex?
Codex is a Distributed Storage Network (DSN) powered by a Decentralised Durability Engine (DDE) which serves as the storage component of the Logos technology stack. Codex is content-addressed - meaning that each and every file in the Codex distributed storage network is addressed by a unique identifier called CID.
While it may be argued that there are existing alternatives in the web3 space that already solve this problem, Codex has a novel approach to fill the various gaps in the existing solutions in terms of data durability without compromising on decentralisation or performance.
What is Waku?
Waku is a family of robust, censorship-resistant communication protocols that can help you build serverless, peer-to-peer communication in your applications. But don’t be fooled by the word ‘communications’ - Waku is not just a chat protocol.
The peer-to-peer Waku network can cater to various use cases that require the transfer of metadata between users, machines, or even AI!
How can decentralised storage complement privacy-preserving communications?
As I mentioned earlier, Waku can be seen as the transport layer for metadata in a decentralised application, and hence, sending big chunks of data is not ideal for Waku. This is exactly where Codex can complement Waku, as it allows users to send much bigger chunks of data (not just megabytes but potentially even petabytes!).
For example, let us assume Bob wants to send a 1GB file to Alice. Bob can store the file on Codex to generate a CID and share it with Alice, allowing them to download it on their machine. But now, imagine that Bob wants to share multiple other files with Alice - this makes the process of manually sharing the CIDs cumbersome. In this case, Waku can be used to automatically share the CIDs of the files that are being uploaded by Bob with Alice while ensuring their communication remains decentralised and censorship-resistant.
In this article, I will demonstrate the above case by building a simple file-sharing application that uses Codex and Waku.
Building on evolving protocols under active development
While Waku is already being used in production by some amazing projects in the web3 space, such as RAILGUN, The Graph, and Portrait.so, it is still rapidly evolving as a service network, with new functionality being added and features such as end-to-end reliability and DoS protection regularly being improved.
Hence, frequent upgrades to the public service network could affect your application’s reliability if it relies on infrastructure operated by Waku under active development. However, you can always reach out to the Waku team on Discord, where Waku core contributors will be able to provide you with the best advice on how to proceed with your Waku integration to ensure the best possible reliability.
Similarly, Codex as a distributed storage network is also under active development, and the team is currently focusing on improving the Altruistic mode experience on the Codex testnet. Features such as the storage marketplace support are still in alpha, and interested developers may need advice from the Codex team before they can use it in production.
However, there is no better time to get started with Waku and Codex, as they are solving some important decentralisation challenges that the Web3 space has been unable to solve with blockchains since its inception.
Now is the time to be an early contributor and build something cool and inspirational!
Setting up the development environment
For Codex
Now, let us go ahead and get started by running a Codex node locally. This should be simple and straightforward thanks to the Codex CLI Installer, which helps you spin up a Codex node by using a single command `npx codexstorage`. You can find step-by-step instructions on running a Codex node in the Codex documentation or in the #step-1 channel in Codex Discord.
Now that this is done, we can interact with our Codex node using the Codex API or the codex-js SDK. In this particular tutorial, we will be using the Codex API directly.
For Waku
You don’t need to run a local node for Waku, as the js-waku SDK helps you run a light client within your browser environment. However, for resource-rich environments like servers, you can also consider using the full node implementation of Waku called nwaku. We will be using js-waku for this tutorial.
Building the application
I’ll be calling my file-sharing application built with NextJS ‘CypherShare’. To help you understand the code better, I have created two files in the `/hooks` folder of the codebase:
- useCodex.tsx - has all the core Codex functionalities, which include the requests made to Codex REST API used to interact with your local Codex node.
- useWaku.tsx - has all the light client implementations of Waku where we use the Light Push protocol for publishing data to a content topic and Filter/Store protocols for subscribing data from a content topic.
How does it work?
Bob, Alice and other users who wish to participate in file sharing can join a particular room using a Room ID. Each room is a content topic - a way in which data is filtered and navigated in the Waku network. When multiple users are in the same room (and therefore subscribed to the same content topic), they can leverage the following Waku protocols to establish communication:
- Light Push protocol for publishing data into the topic
- Filter protocol for subscribing to incoming data into the content topic.
- You can alternatively use Store protocol instead of Filter protocol if you wish to have temporary persistence for your messages (imagine this as a temporary cache, ephemeral compared with the durable storage offered by Codex).
Let us take this step by step by analysing the important code snippets in the useCodex.tsx and useWaku.tsx files. We begin with file uploads and downloads using Codex:
Using Codex API for uploading a file and fetching the CID
// From CodexClient in useCodex.ts public async uploadFile( file: File, onProgress?: (progress: number) => void ): Promise{ try { const url = `${this.baseUrl}/v1/data`; return new Promise((resolve) => { const xhr = new XMLHttpRequest(); // Set up progress tracking if (onProgress) { xhr.upload.addEventListener('progress', (event) => { if (event.lengthComputable) { const percentComplete = Math.round((event.loaded / event.total) * 100); onProgress(percentComplete); } }); } xhr.open('POST', url, true); xhr.setRequestHeader('Content-Type', file.type); xhr.setRequestHeader('Content-Disposition', `attachment; filename="${file.name}"`); xhr.onload = function() { if (xhr.status >= 200 && xhr.status < 300) { try { const response = JSON.parse(xhr.responseText); // Extract the CID from the response const cid = typeof response === 'object' ? (response.id || response.cid || (response.data && (response.data.id || response.data.cid))) : response; resolve({ success: true, id: cid }); } catch { // If response is not JSON but status is success const rawText = xhr.responseText.trim(); resolve({ success: true, id: rawText // Use the raw text as the ID }); } } else { let errorMessage = 'Upload failed'; resolve({ success: false, error: errorMessage }); } }; xhr.onerror = function() { resolve({ success: false, error: 'Network error occurred during upload' }); }; xhr.send(file); }); } catch (error) { return this.handleNetworkError(error, 'Error uploading file:'); } }
Using Codex API for downloading a file using CID
// From CodexClient in useCodex.ts public async downloadFile( fileId: string, onProgress?: (progress: number) => void ): Promise{ try { // First check if the node is active if (!await this.isNodeActive()) { return { success: false, error: 'Codex node is not active. Please check your connection.' }; } // Step 1: Get the file metadata const metadataUrl = `${this.baseUrl}/v1/data/${fileId}/network`; // Make metadata request const metadataResponse = await fetch(metadataUrl, { method: 'POST', headers: { 'Accept': 'application/json', 'Content-Type': 'application/json', } }); if (!metadataResponse.ok) { return { success: false, error: `Failed to fetch metadata: ${metadataResponse.status} ${metadataResponse.statusText}` }; } const metadata = await metadataResponse.json(); const { manifest } = metadata; const { filename, mimetype } = manifest; // Step 2: Download the file content const downloadUrl = `${this.baseUrl}/v1/data/${fileId}/network/stream`; // Use XMLHttpRequest for progress tracking return new Promise((resolve) => { const xhr = new XMLHttpRequest(); // Set up progress tracking if (onProgress) { xhr.addEventListener('progress', (event) => { if (event.lengthComputable) { const percentComplete = Math.round((event.loaded / event.total) * 100); onProgress(percentComplete); } }); } xhr.open('GET', downloadUrl, true); xhr.responseType = 'blob'; xhr.onload = function() { if (xhr.status >= 200 && xhr.status < 300) { resolve({ success: true, blob: xhr.response, filename, mimetype }); } else { let errorMessage = 'Download failed'; resolve({ success: false, error: errorMessage }); } }; xhr.onerror = function() { resolve({ success: false, error: 'Network error occurred during download' }); }; xhr.send(); }); } catch (error) { return this.handleNetworkError(error, 'Error downloading file:'); } }
Now, it’s time to get the Waku component working. Here are some important code snippets for the step-by-step implementation of the Waku part of the app:
Waku setup and initialisation with content topics, encoders, and decoders
Content topics should follow the naming format suggested in the Waku documentation. In the below code snippet, we set up a dynamic content topic based on the Room ID entered by the user. Then, we proceed with initialising the light node using the `createLightNode()` function and the `defaultBootstrap` node, which uses the bootstrap fleet to facilitate building and testing purposes.
Finally, we initialise encoders and decoders using the content topics. In the `createEncoder()` function, you can set `ephemeral: true` if you wish the data to be ephemeral. The js-waku documentation can help you understand the above-mentioned process in more general terms.
// Initialize Waku node
const initWaku = useCallback(async () => {
  if (wakuNodeType !== 'light') {
    // Only initialize for light node type
    return;
  }

  try {
    setIsConnecting(true);
    setError(null);

    // Create a new content topic with the current room ID
    const newContentTopic = `${BASE_CONTENT_TOPIC}room-${roomId}/proto`;
    setContentTopic(newContentTopic);

    // Create a light node with explicit protocols
    const lightNode = await createLightNode({
      numPeersToUse: 3, // Increase number of peers for better connectivity
      defaultBootstrap: true,
      networkConfig: {
        contentTopics: [newContentTopic],
      },
    });

    // Start the node
    await lightNode.start();

    // Wait for peer connections with timeout
    try {
      const timeout = 15000;
      await Promise.race([
        lightNode.waitForPeers([Protocols.LightPush, Protocols.Filter]),
        new Promise((_, reject) =>
          setTimeout(() => reject(new Error('Peer connection timeout')), timeout)
        )
      ]);
    } catch (peerError) {
      console.warn('Peer connection issue:', peerError);
      // Continue anyway, as we might connect to peers later
    }

    // Create encoder and decoder
    const newEncoder = createEncoder({
      contentTopic: newContentTopic,
      ephemeral: true,
    });

    const newDecoder = createDecoder(newContentTopic);

    setNode(lightNode);
    setEncoder(newEncoder);
    setDecoder(newDecoder);
    setIsConnected(true);
    setIsConnecting(false);

    // Subscribe to messages
    await subscribeToMessages(lightNode, newDecoder, newContentTopic);
  } catch (err) {
    console.error('Error initializing Waku:', err);
    setError(err instanceof Error ? err.message : 'Unknown error initializing Waku');
    setIsConnecting(false);
    setIsConnected(false);
  }
}, [roomId, wakuNodeUrl, wakuNodeType, isConnecting, isConnected]);
Defining the message structure using Protobuf
// Define the FileMessage structure using Protobuf
const FileMessage = new protobuf.Type("FileMessage")
  .add(new protobuf.Field("timestamp", 1, "uint64"))
  .add(new protobuf.Field("sender", 2, "string"))
  .add(new protobuf.Field("fileName", 3, "string"))
  .add(new protobuf.Field("fileSize", 4, "float"))
  .add(new protobuf.Field("fileType", 5, "string"))
  .add(new protobuf.Field("fileId", 6, "string")); // CID of the file

// Correct content topic format following Waku protocol specification
// Format: /{application-name}/{version}/{content-topic-name}/{encoding}
const BASE_CONTENT_TOPIC = "/fileshare/1/";
Subscribing to a content topic to retrieve messages
// Subscribe to messages
const subscribeToMessages = async (lightNode: LightNode, messageDecoder: any, topic: string) => {
  try {
    console.log('Setting up message subscription for topic:', topic);

    // Create a simple callback that logs and forwards messages
    const messageHandler = (wakuMessage: DecodedMessage) => {
      if (!wakuMessage.payload) {
        console.log('Received empty message payload');
        return;
      }

      try {
        // Decode the message using protobuf
        const decodedMessage = FileMessage.decode(wakuMessage.payload) as unknown as WakuFileMessage;

        console.log('Successfully decoded message:', {
          fileName: decodedMessage.fileName,
          sender: decodedMessage.sender,
          fileId: decodedMessage.fileId,
          timestamp: new Date(decodedMessage.timestamp).toISOString()
        });

        // Call the callback if provided
        if (onFileReceived) {
          onFileReceived(decodedMessage);
        }
      } catch (decodeError) {
        console.error('Failed to decode message:', decodeError);
      }
    };

    // Try to use direct filter subscription (newer SDK versions)
    try {
      await lightNode.filter.subscribe(messageDecoder, messageHandler);
      return;
    } catch (error1) {
      console.warn('Direct filter subscription failed:', error1);
    }

    // Fallback to other subscription methods if needed
    // ...
  } catch (err) {
    console.error('❌ Error in message subscription process:', err);
    setError('Failed to subscribe to messages: ' + (err instanceof Error ? err.message : String(err)));
  }
};
Publishing messages to a content topic
// Send a file message
const sendFileMessage = useCallback(async (fileData: {
  fileName: string;
  fileSize: number;
  fileType: string;
  fileId: string;
}) => {
  if (!node || !encoder || !isConnected) {
    console.error('Cannot send message: Waku node is not connected');
    setError('Waku node is not connected');
    return false;
  }

  try {
    // Generate a unique sender ID if not already available
    const getTabSpecificSenderId = () => {
      // Create a unique ID for this tab instance
      const tabId = sessionStorage.getItem('wakuTabId') || `tab-${Math.random().toString(36).substring(2, 10)}`;
      if (!sessionStorage.getItem('wakuTabId')) {
        sessionStorage.setItem('wakuTabId', tabId);
      }

      // Get or create the user ID from localStorage
      const userId = localStorage.getItem('wakuUserId') || `user-${Math.random().toString(36).substring(2, 10)}`;
      if (!localStorage.getItem('wakuUserId')) {
        localStorage.setItem('wakuUserId', userId);
      }

      // Combine them for a tab-specific sender ID
      return `${userId}-${tabId}`;
    };

    const senderId = getTabSpecificSenderId();

    // Store the current sender ID in sessionStorage for this tab only
    sessionStorage.setItem('wakuSenderId', senderId);

    // Create a new message object
    const protoMessage = FileMessage.create({
      timestamp: Date.now(),
      sender: senderId, // Use the unique sender ID
      fileName: fileData.fileName,
      fileSize: fileData.fileSize,
      fileType: fileData.fileType,
      fileId: fileData.fileId,
    });

    // Serialize the message using Protobuf
    const serializedMessage = FileMessage.encode(protoMessage).finish();

    // Send the message using Light Push
    const result = await node.lightPush.send(encoder, {
      payload: serializedMessage,
    });

    return true;
  } catch (err) {
    console.error('❌ Error sending file message:', err);
    setError(err instanceof Error ? err.message : 'Unknown error sending file message');
    return false;
  }
}, [node, encoder, isConnected, contentTopic, peerCount]);
With all the above core features implemented, the decentralised and censorship-resistant file-sharing application should now be ready to use! For a deeper understanding of the code snippets, I highly recommend checking out the individual documentation of Waku and Codex, as they describe a more general approach to implementation.
The final interface of my CypherShare file-sharing application looks like this:
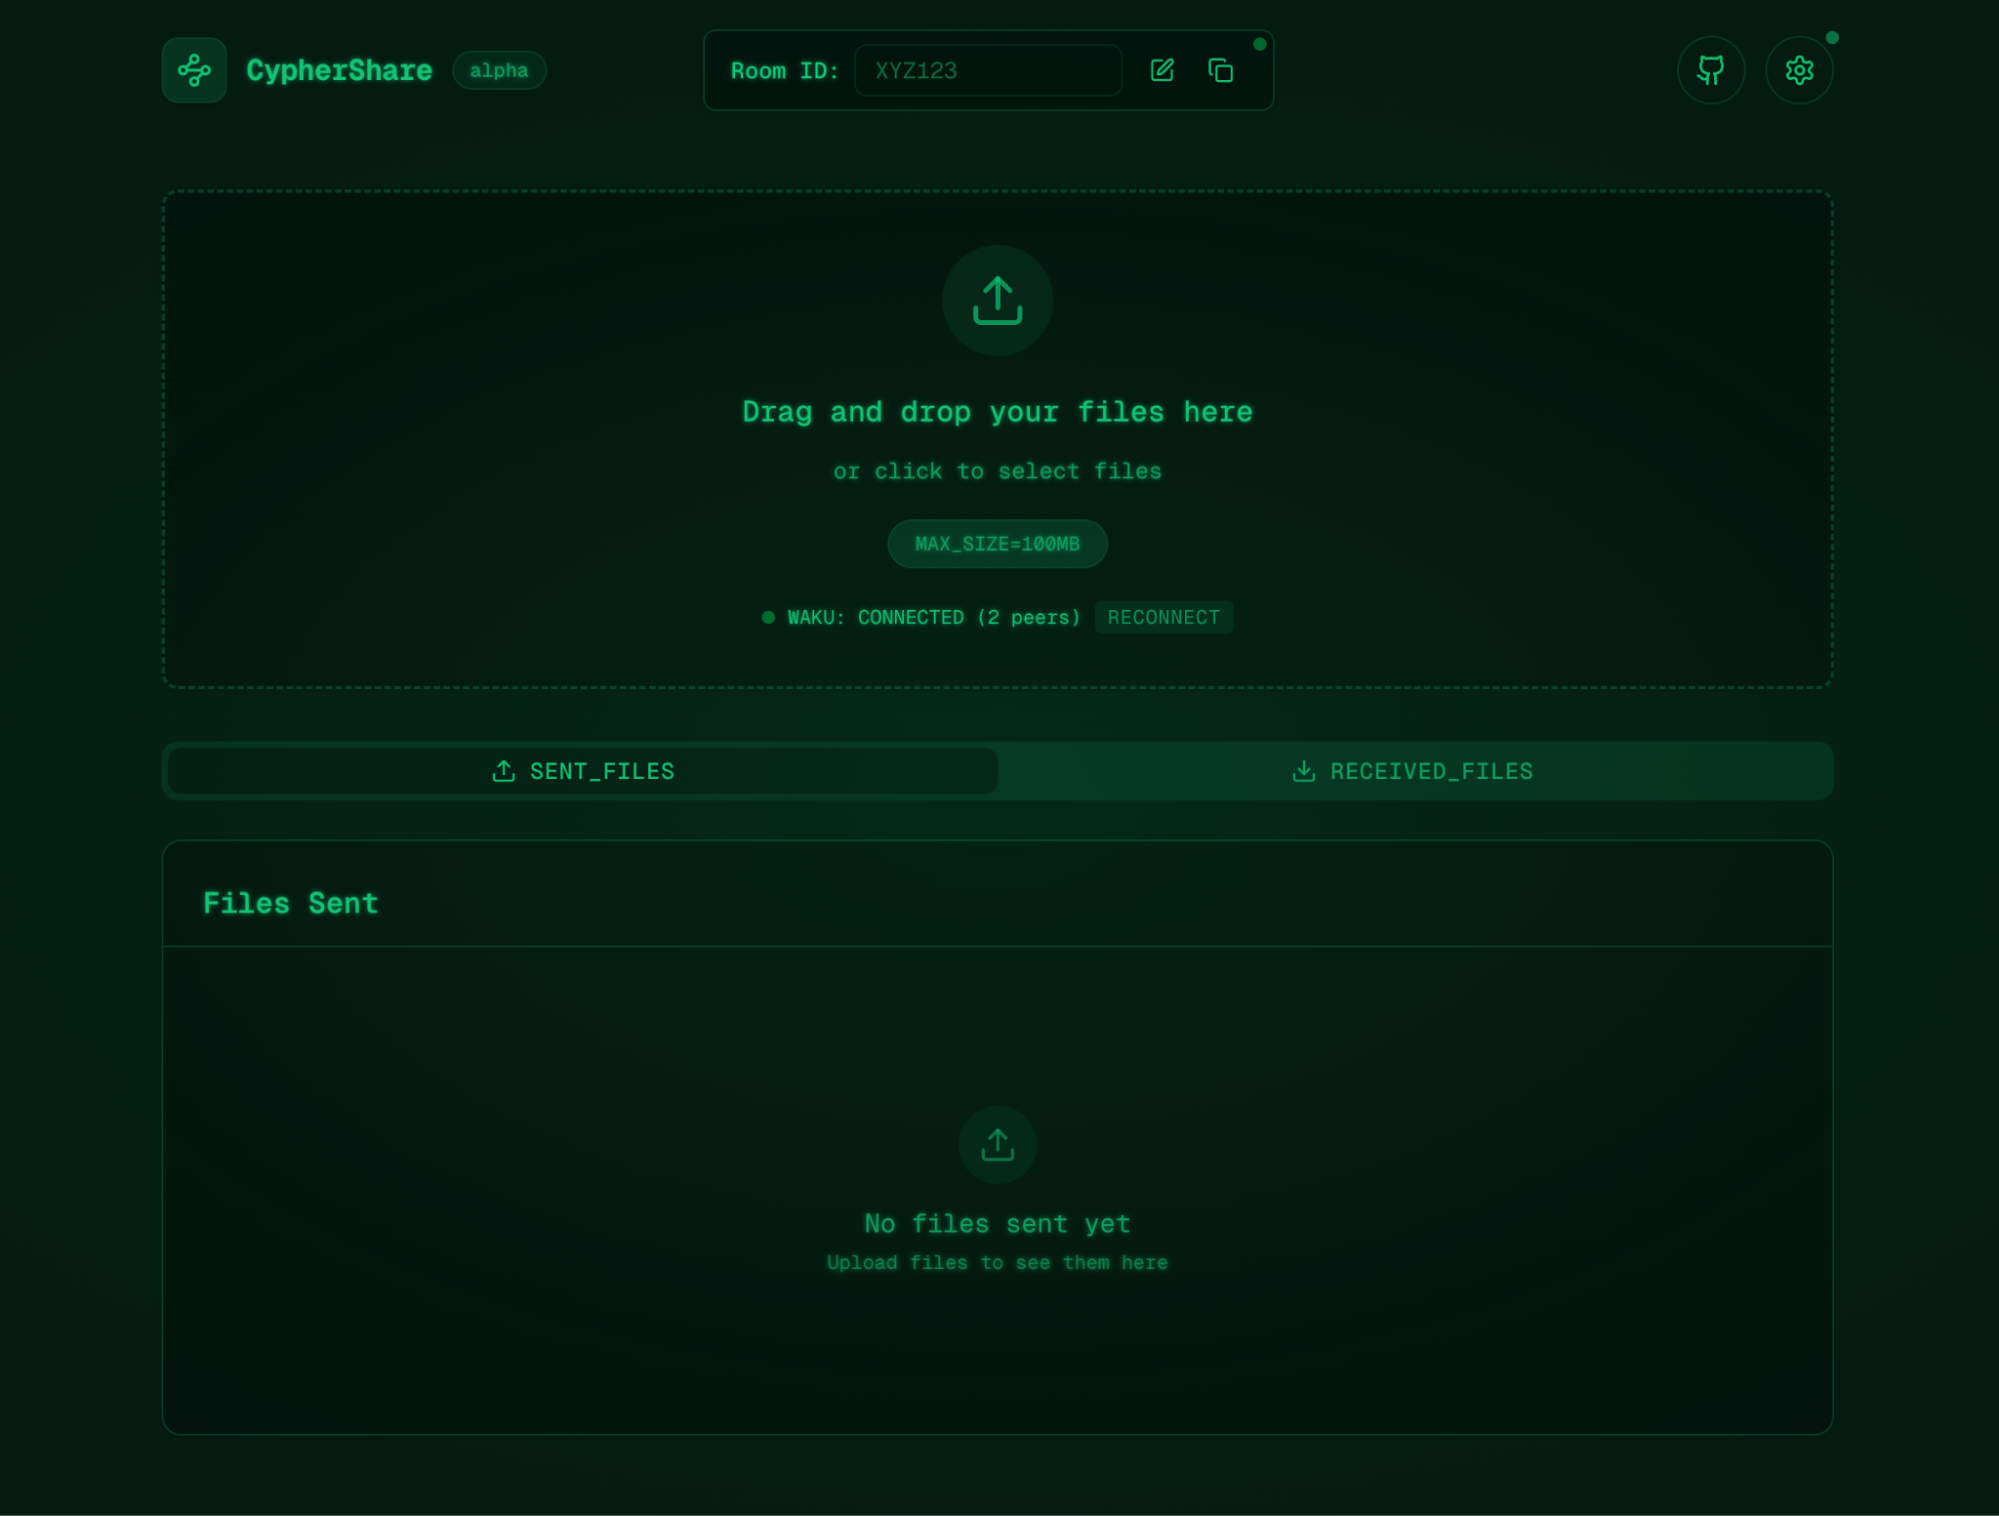
The codebase is available in this GitHub repository, and a live version of the application is hosted here. Again, please be mindful that the hosted application uses the bootstrap network along with your local Codex client.
Final words
Web3 is not all about blockchains—complementary technologies like Waku and Codex are essential to building applications across numerous use cases where decentralisation and censorship resistance are paramount.
The codebase for this project is open source. Feel free to contribute by improving it or adding additional features by integrating your favourite web3 projects.
Here are some ideas that are on top of my mind:
- Encrypted private file sharing: to align more with cypherpunk values, try integrating TACo, Lit protocol or something similar that can aid private file sharing. Waku and Codex are by transparent and open networks by default, and therefore access control needs to be implemented separately.
- Try marketplace support for Codex: while the Codex marketplace is still in alpha, you can try looking at the docs and codebase to work on a marketplace integration for the file-sharing app that will make the files persistent even when your Altruistic mode node is unavailable to serve them.
- Find a use case for L2 blockchains: there are various ways an L2 blockchain can be integrated with this type of application. Get creative and try something fun!
I hope this article helped to improve your understanding of Distributed Storage Networks (DSNs) and decentralised communications. IFT contributors will be happy to answer any questions you may have, so please do not hesitate to reach out with feedback or queries!
Author: @hackyguru